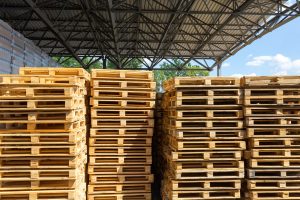
When you consider the benefits of using a wooden pallet, you’ll find they offer more than just a sturdy platform for goods. Their durability and strength make them ideal for heavy loads and rough handling. Cost-effectiveness is another key advantage, as wooden pallets are cheaper than their plastic or metal counterparts and can be easily repaired. Not to mention, they’re environmentally friendly, made from renewable resources and biodegradable. But there’s more to explore, especially when you see how they fit into various industries and their role in a circular economy.
Key Takeaways
– Wooden pallets offer robust durability and strength, ideal for heavy loads and rough handling.
– They are cost-effective, cheaper to purchase and repair compared to plastic or metal alternatives.
– Made from renewable resources, wooden pallets are biodegradable and environmentally friendly.
– Repairs are easy and affordable, using basic tools and readily available materials.
– Wooden pallets are versatile, suitable for logistics, retail, agriculture, and various DIY projects.
Durability and Strength
Wooden pallets offer impressive durability and strength, making them ideal for heavy loads and rough handling. When you’re moving large quantities of goods, you need a reliable solution that can withstand the rigors of transportation and storage. Wooden pallets excel in this area because they’re built from sturdy materials like oak and pine, which provide a robust framework capable of bearing substantial weight.
You’ll find that the structural integrity of wooden pallets helps prevent damage to your products. The dense wood fibers create a resilient surface that resists splintering and cracking under pressure. This means fewer replacements and less downtime, ensuring your operations remain efficient.
Additionally, wood pallets can handle a variety of environmental conditions. Whether you’re dealing with fluctuating temperatures, humidity, or exposure to the elements, these pallets maintain their strength and form. This versatility makes them suitable for both indoor and outdoor use, offering you flexibility in your logistics.
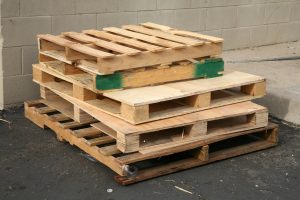
Moreover, their repairability is a key advantage. If a wooden pallet gets damaged, you can often fix it with basic tools and materials. This not only extends their lifespan but also provides a cost-effective solution to maintaining your pallet inventory.
Cost-Effectiveness
Using wooden pallets can greatly reduce your operational costs due to their affordability and longevity. They offer a cost-effective solution for businesses looking to optimize logistics and storage without sacrificing quality.
Here are four key reasons why wood pallets are financially advantageous:
- Lower Initial Investment: Wooden pallets are generally cheaper to purchase compared to plastic or metal alternatives. This lower upfront cost allows you to allocate funds to other critical areas of your business.
- Reusability: Their durable nature means wood pallets can be reused multiple times with minimal maintenance. This reusability reduces the need for frequent replacements, thereby lowering long-term expenses.
- Repairability: Unlike plastic or metal pallets, wooden pallets can be easily repaired if damaged. Simple tools and a few new boards can extend the life of a pallet, saving you the cost of buying new ones.
- Widespread Availability: Wooden pallets are readily available from numerous suppliers, which fosters a competitive market. This abundance ensures you can always find high-quality pallets at reasonable prices.
Environmental Benefits
In addition to being cost-effective, opting for wood pallets greatly reduces your environmental footprint. Made from renewable resources, wooden pallets offer a sustainable alternative to plastic and metal options. Trees used for pallets often come from managed forests, ensuring that deforestation is minimized. Also, wood is biodegradable, so when a wooden pallet reaches the end of its life cycle, it decomposes naturally, reducing landfill waste.
By choosing wood pallets, you’re also supporting a lower carbon footprint. Wood acts as a carbon sink, absorbing carbon dioxide during its growth. Even when converted into pallets, the wood retains this carbon, effectively reducing greenhouse gas emissions. Additionally, the energy required to produce wooden pallets is much less than that needed for plastic or metal ones, further conserving natural resources and reducing emissions.
Wood pallets are easily recyclable. They can be repurposed into mulch, animal bedding, or even new pallets. This recycling capability not only extends the material’s life but also minimizes waste. When you choose wooden pallets, you actively contribute to a circular economy, emphasizing reuse and resource efficiency.
Therefore, wooden pallets are an environmentally responsible choice, aligning with sustainable practices and goals.
Ease of Repair
Repairing wooden pallets is advantageous for businesses due to several reasons:
- Affordability: Wood pallets need inexpensive materials like nails, hammers, and replacement boards, keeping repair costs low compared to plastic or metal pallets.
- Availability: Replacement parts for wood pallets are easily found, preventing delays in repairs due to supply issues and ensuring quick restoration of pallet functionality.
- Simplicity: Repairing wood pallets doesn’t demand specialized skills, making it accessible for existing staff with basic carpentry knowledge and eliminating the need for external contractors.
- Reusability: Damaged wood pallets can often be repurposed or recycled, prolonging their lifespan by using parts in good condition for fixing other pallets and maximizing resource efficiency.
Versatility in Use
Beyond their ease of repair, wood pallets offer remarkable versatility, making them suitable for a wide range of applications. In logistics and warehousing, you can use them for stacking, storing, and transporting goods efficiently. Their standard sizes make them compatible with forklifts and pallet jacks, simplifying material handling.
In retail, wooden pallets can be repurposed as display units or shelving. Their rustic charm adds aesthetic value while maintaining functionality. If you’re in manufacturing, wooden pallets can serve as cost-effective platforms for assembly lines, enhancing workflow and organization.
For those in agriculture, these pallets are invaluable. Use them to transport produce, store feed, or even construct compost bins. Their durability ensures they stand up well to outdoor conditions.
Wooden pallets also find a place in DIY projects. Convert them into furniture, garden planters, or storage solutions. Their adaptability means you can customize them to fit your needs, whether it’s a coffee table or a vertical garden.
Frequently Asked Questions
Are Wooden Pallets Safe for Food Transportation?
Yes, wood pallets can be safe for food transportation if they’re treated to meet ISPM 15 standards. Make sure they’re heat-treated, not chemically treated, and regularly inspected for contamination, mold, and damage to guarantee food safety.
How Do Wooden Pallets Compare to Plastic Pallets in Terms of Weight?
When comparing wood pallets to plastic ones, wooden pallets are generally heavier. Think of them as the sturdy oak tree in a forest, providing robust support but at the cost of increased weight.
Can Wood Pallets Be Customized for Specific Shipping Needs?
Yes, you can customize wood pallets for specific shipping needs. You can adjust dimensions, load capacities, and even add features like reinforcements or compartments to meet particular requirements, ensuring efficient and secure transportation.
What Are the Fire Safety Concerns With Wooden Pallets?
You might worry about fire safety with wood pallets. They’re more flammable than plastic or metal. Guarantee proper storage, regular inspections, and compliance with fire codes to mitigate risks. Consider fire-resistant treatments if necessary.
How Should Wooden Pallets Be Stored to Prevent Damage?
You should store wooden pallets in a dry, well-ventilated area. Stack them evenly to avoid warping and make sure they’re off the ground to prevent moisture damage. Regularly inspect for signs of wear or pest infestation.
Conclusion
To sum it up, you can’t go wrong with wood pallets. Their durability and strength make them almost indestructible, while their cost-effectiveness keeps your budget intact.
Plus, they’re a green choice, supporting our planet through recyclability and biodegradability. Easy to repair and versatile across industries, wooden pallets are the Swiss Army knife of material handling.
Choose wooden pallets and you’ll wonder how you ever managed without them.